Coat of Arms development

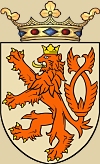
Here I'll show how I developed embroidered family crests starting from a small copy from a book (1st image on right) or internet.
Then I research the colors and do a remake or new design in PhotoShop (2nd image on right).
I obtained a sampler booklet of the silks, used by my embroiderers and I select the colors, which they must use.
Click to view.


Here you see how I work. My PhotoShop design and selecting the most appropriate colors for each item.
I then email the crest image and silk choice numbers to the embroiderers. They then print the design on butter paper and prick small holes along the lines. Then they put that paper on the cloth and rub chalk paste through the holes so that the design is transfered. See below. White chalk outlines on the green cloth.
Embroidery can begin.

Embroiders have printed my design on the left and are using my chosen silk colors.

First steps for feather plume. Helmet cutout added. Tower needs more shading.

The shield and scroll are first embroidered on two separate pieces of "silver" ribbed cloth.

"Silver" background cloth. Gauntlet and cross in silver and gold bullion wire.
Grass and rocks in two shades of color each.

Shield and scroll pieces have been cut out. Areas padded and stitched onto main cloth.

Helmet still needs to be done; more shading needed in mantle.
Bottom part of the cross forgotten.

Helmet completed in silver bullion. More shading in mantle. Plume finished.

Bottom part of cross added.

Finished McClanahan coat of arms
|